How to create Dynamic Search Ads - Google Ads
You’ve weighed the pros and cons of Google dynamic search ads (wait – you haven’t? -- then read this). You’re ready to implement Google DSA into your Google Ads campaign. Now what?
We’re here to guide you through the process, with a quick and easy tutorial and custom tips to help create a dynamic search, get it up and running right away, and get the most out of your campaign.
Part 1 of 2: Create a New search Campaign
Inside the Google Ads platform, select Campaigns, then click the + BUTTON to create a new campaign.
- Select your goal (e.g., sales, leads, traffic)
- Select Search as your campaign type
- Select how you’d like to reach your goal (e.g., Website visits)
- Click CONTINUE
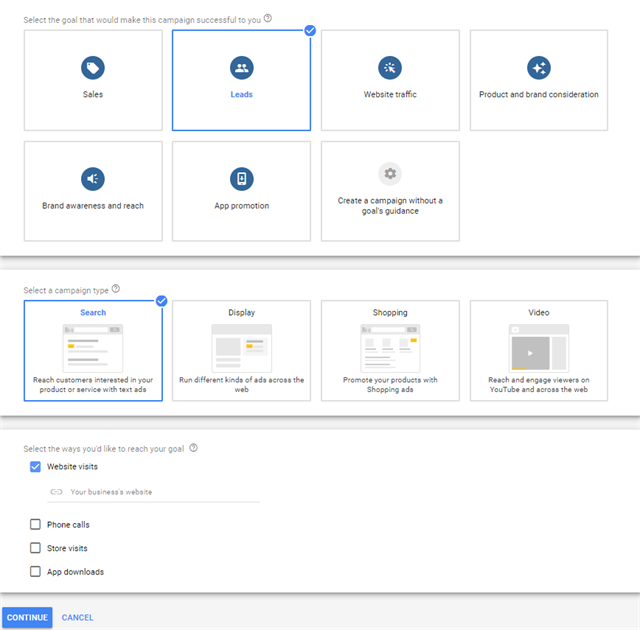
Step 1: Campaign Settings (Important)

Don’t skip this - This step is where the dynamic search ads are selected!
First, adjust each campaign setting as needed: networks, locations, languages, budget, bidding, extensions, etc.
Tip - Under Networks, uncheck the Display Network – target the Search Network only for best performance.
Before clicking Continue, open the Additional Settings dropdown.

Click ENABLE DYNAMIC SEARCH ADS for this campaign, enter your root domain and select your targeting source. Use Google Index of My Website suffices for most use cases. (We’ll exclude specific pages from the DSA campaign in another step.) Click SAVE AND CONTINUE.
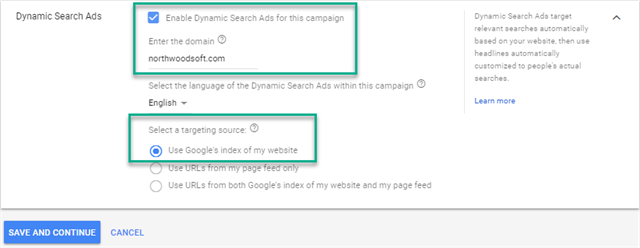
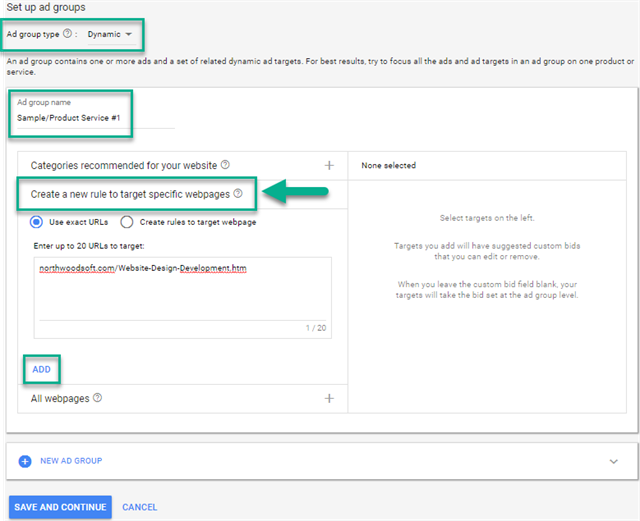
Step 2: Set Up Ad Groups

In step 2, we recommend creating ad groups based on products/services. This allows you to create ad descriptions specific to each product/service. It also allows you to see which products/services drive the most traffic and perform best, so you can optimize accordingly. Be sure to click ADD after inserting a URL, otherwise the DSA will target your entire site.
Tip - If your number of products/services is small enough to manage manually, simply insert the URL for each landing page into its respective ad group. If you have a large volume of webpages (e.g., ecommerce), use the rules option to target specific product groups with each respective ad group (e.g., women’s dress shoes, men’s athletic shoes, etc.).
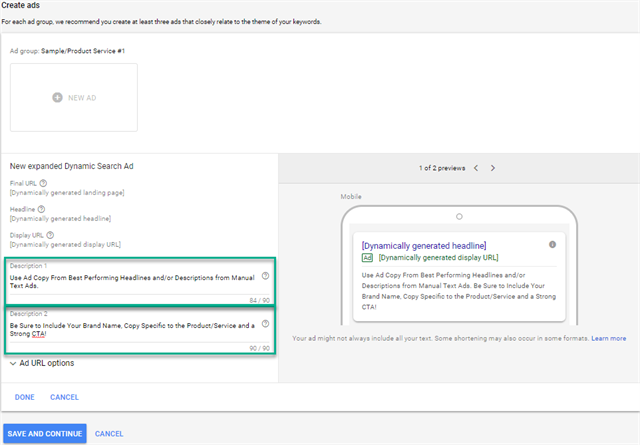
Step 3: Create Ads

Google’s dynamic search ads use machine learning to automatically create headlines and display URLs based on users’ search queries and the content of your targeted web pages. Even though machine learning has come a long way, Google still needs your help to write descriptions.
Although it may seem like an unexpected, unwelcome task, you can benefit from placing copy you write yourself in the dynamic search ad. You can ensure that essential brand messaging, specific product/service benefits and important calls to action appear in your ad.
Tip – Are you running any search campaigns with manual text ads? If so, pull out your best-performing copy and incorporate it into your DSA descriptions. Combine high-performing headlines and description lines to form your new descriptions. Be sure to include your brand name, copy specific to the product/service and a strong call to action.
After completing your ad copy, you’ve completed part 1 of your dynamic search ad creation. You’re ready for the final touches before going live.
Part 2 of 2: Optimizing for Success
Technically, at this point, your dynamic search ads are live and ready to go. But for the biggest bang for your buck, make a few final adjustments.
Step 1: Extensions
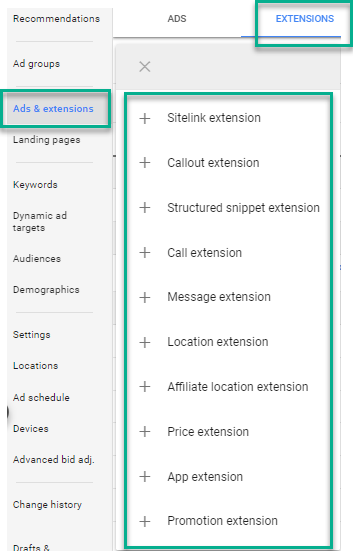
With automated ad headlines, the more hand-controlled copy in our ads the better. Extensions allow us to fill our ad copy with additional benefits, unique selling points and calls to action. Exhaust every possible extension relevant to your business. Google’s algorithm will automatically include as many extensions as possible in the ad, along with the highest performing extensions. So load them up.
Step 2: Negative Keywords
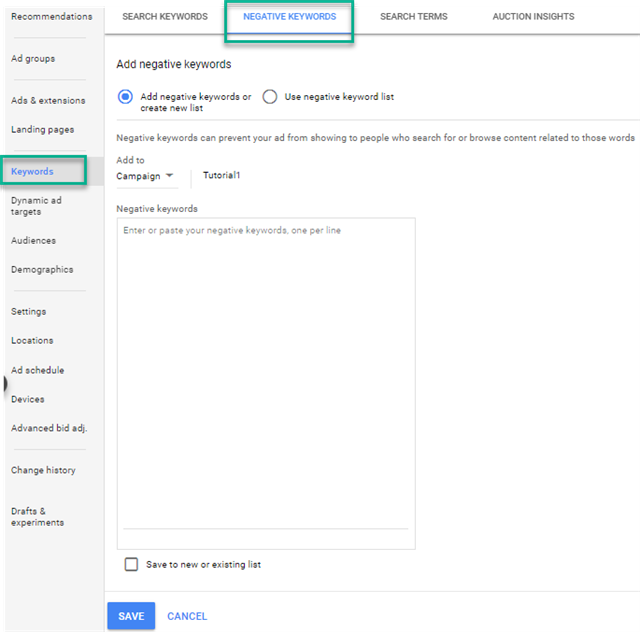
Think of a dynamic search ad campaign as a “broad” match type, but for your targeted web page. That makes negative keywords important; fill that list with terms you do NOT want to target. If you have a negative keyword list built already, start there. Pay attention to the Search Terms reports as your campaign goes on. It can help you to further build out your negative keyword list. That list will help you avoid spending money on irrelevant terms.
Important Tip – Make a conscious decision: Do you want to spend advertising dollars on your brand name? One of the best use cases for dynamic search ads rests on discovery of new, unbranded keywords to add to your manual search campaigns. In most cases, your organic rankings will be strong for branded terms. Those two points combined lead me to usually focus DSA campaigns solely on unbranded terms. If you decide the same, add your brand name as a negative keyword. Note: If you do not exclude your brand name, your DSA campaign will likely include heavily branded terms.
Step 3: Negative Dynamic Ad Targets (URLs)
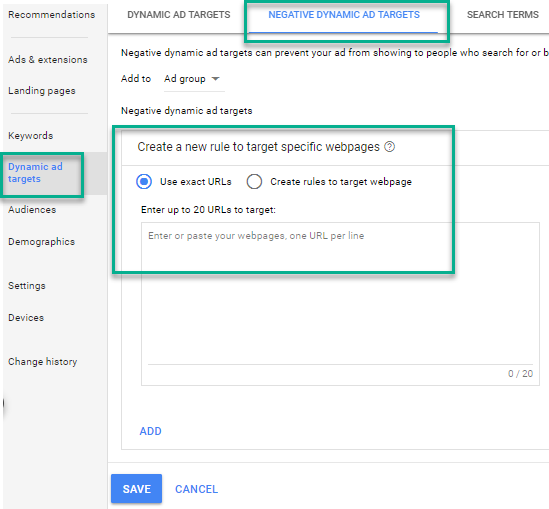
Set negative dynamic ad targets to avoid spending your advertising budget on irrelevant landing pages. Under your campaign (or ad group), select Dynamic Ad Targets and navigate to Negative Dynamic Ad Targets.
List any URL you do not want to target or have as a landing page. For example: career pages, FAQs, history, about us, etc.
Your Dynamic Search Ads are Ready – Go Forth and Conquer
That’s it. Your dynamic search ad campaign is live, and Google’s machine learning is working in your favor!
As part of your ongoing optimization, pay close attention to the search term report in your dynamic search ad campaign as data rolls in. Remember that DSAs are essentially a broad match for your landing page; you’re casting a wide net. Watch for irrelevant and under-performing search terms. When you see them, add them as negative keywords.
On the flip side, as you find new desirable and high-performing keywords, add them to manual campaigns to get more control, and add them as negatives in your DSA to eliminate duplicate keyword targets.
Have additional set up tips? We love to see them. Add them to the comments below.


