Updated: June 6, 2022
Originally Published: July 23, 2018
Microsoft offers SharePoint developers an abundance of tools and many ways to solve any given problem, and that’s fine. But without proper understanding of those means and options and of their implications for your business needs, you can get into trouble.
The tips that follow can help you stay out of trouble and give your end users the best possible experience as they work in SharePoint.
1. Use Content Delivery Networks When Possible
Users close to your SharePoint instance get great service. Those farther away get worse service. A Content Delivery Network (CDN) closes the geographic gap by allowing you to reference common JavaScript and CSS libraries hosted somewhere other than in one folder on one site in your entire site collection. Adding references to a CDN that hosts a library such as jQuery will improve the load time for that file, for both near and distant users. CDNs are designed to be highly distributed and extremely fast.
An example of a reference to the jQuery UI library hosted on the Microsoft CDN.
That said, we do not recommend using CDNs if your SharePoint environment is on-premises. In an on-premises environment, users should always be connected to the network hosting the environment. If an internet connection goes down, users would not be able to download files from a CDN, but they could still access on-premises SharePoint. If you do use a CDN for some resources in your on-prem environment, make sure you have a copies of the files related to those resources on your SharePoint environment, referenced as a failover. That way, users can keep working normally when external resources won’t load.
Microsoft’s Ajax CDN is a great resource for commonly used JavaScript frameworks and CSS libraries such as jQuery, Bootstrap, jQuery UI, and jQuery Datatables.
2. Use the Content Search Web Part Instead of the Content Query Web Part
SharePoint content managers, developers, and administrators might need to display content -- e.g., a list of news items, a list of employees, or benefits documents -- on a page. Microsoft provides two built-in web parts for rolling up content for display. Many developers and administrators default to the Content Query Web Part because it’s easier to configure, but the Content Search Web Part offers better performance. It also queries content that exists across multiple site collections, while the Content Query Web Part is limited to one site collection.

Configuring the Content Query Web Part is similar to setting up a new SharePoint list view, although it does not offer the best performance.
The Content Query Web Part directly hits the content database with its queries; the Content Search Web Part, by contrast, queries against a search index created when the search service crawls your site content and adds new or updated content to the search index. This prevents an overload of calls to your content database.
Note: SharePoint Online environments are crawled several times each day, because content is being managed and updated continuously. Note that in cloud-based SharePoint, you have no control over when or how frequently your site collection is crawled. This control is only available in on-prem environments.


Setting up a Content Search Web Part takes quite a bit more configuration, but is much more powerful and scalable.
Another big difference in the Content Rollup web parts is that the Content Query Web Part does not perform as well for large lists, which Microsoft defines as a list of more than 5,000 items. So Content Query Web Part does not scale-up well. It performs admirably below the 5,000 threshold, but if you expect your content to grow, opt for the Content Search Web Part.
3. Optimize Images
Using Image Renditions
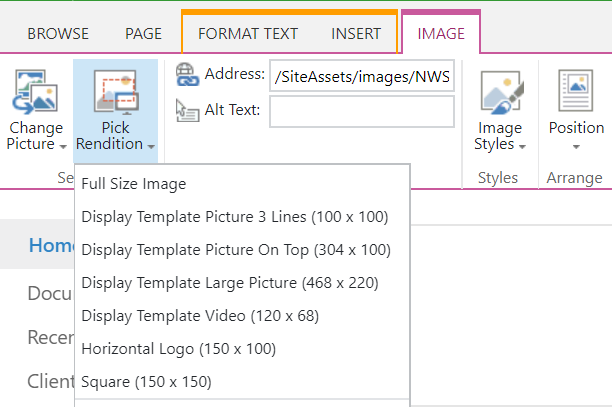
SharePoint Online’s Image Renditions feature allows you to predefine image sizes, then choose which rendition to display when you add an image to a page. You cannot rely on CSS alone to resize images for you, because CSS resizes images only after loading the full-resolution version of the image. Image Renditions will take the smaller of the two dimensions defined for a rendition, then crop the other dimension from the center of the image.

When adding an image to a page, you can choose the rendition to help the page load faster, instead of relying on CSS to resize your images.
Note: Publishing must be enabled on your site and the Publishing Infrastructure must be enabled at the site collection level to use the Image Rendition feature.
Delaying Image Loading
By default, browsers pre-fetch images, which delays the page load until all images and the rest of the page content have been downloaded. To mitigate longer page load times, use HTML data attributes and JavaScript to delay loading of images – especially those below the fold and out of view as the page loads -- until after the rest of the page content has loaded.
For more information, see our blog on optimizing images.
If you need additional guidance or support to optimize your SharePoint performance, don't hesitate to contact us.


